Raspberry Pi I2C Real-time Clock Setup
The RTC module is a hardware clock that keeps time for a Raspberry Pi (or other microcontroller). It provides an accurate time and date source that is used to track time when powered off or when not connected to a network time source such as an NTP server on the Internet.
The module I am using is one that I purchased on eBay. There are several versions. I chose one using the DS1307 which is an I2C bus module. There are other types which support SPI or other interfaces.
The RTC module includes the basic support circuit for the Maxim DS1307
Components Used
- Raspberry Pi 3
- 2017-03-02-raspbian-jessie
- DS1307 i2c real time clock module (purchased on eBay)
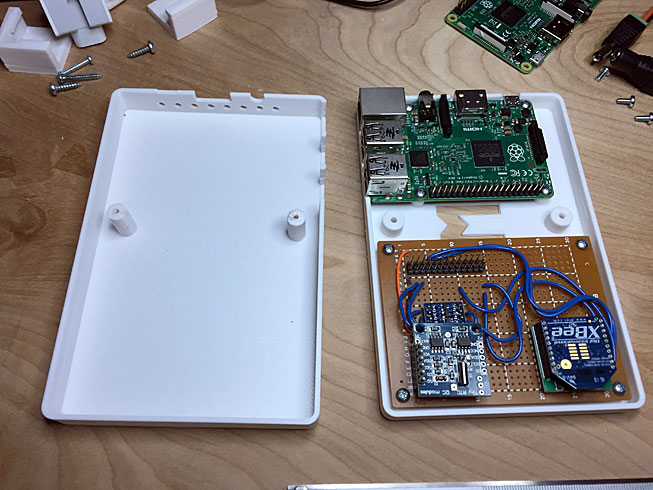
This is a photo of the Raspberry Pi in the 3d printed case I designed in FreeCAD. The RTC module is on the left with a partially visible level shifting module near it. On the right is an XBee module for connection to non-wifi Arduino nodes. I currently have a single node setup as a weather collection station with a SparkFun FIO v3 Arduino using the XBee radio module.
Enable I2C Bus in the OS
Use raspi-configor in the latest Jessie version, the configuration program in the GUI.
Verify I2C Linux module is loaded
Look for i2c_dev in the output from lsmod.
pi@mb-pisvr1:~ $ lsmod
Module                  Size  Used by
bnep                   12051  2
hci_uart               19956  1
btbcm                   7916  1 hci_uart
bluetooth             365511  22 hci_uart,bnep,btbcm
hid_logitech_hidpp     20558  0
brcmfmac              222874  0
brcmutil                9092  1 brcmfmac
cfg80211              543027  1 brcmfmac
hid_logitech_dj        12173  0
rfkill                 20851  4 bluetooth,cfg80211
snd_bcm2835            24427  0
snd_pcm                98501  1 snd_bcm2835
snd_timer              23904  1 snd_pcm
spidev                  7373  0
snd                    70032  3 snd_timer,snd_bcm2835,snd_pcm
bcm2835_gpiomem         3940  0
spi_bcm2835             7596  0
i2c_bcm2835             7167  0
joydev                  9988  0
evdev                  12423  8
uio_pdrv_genirq         3923  0
fixed                   3285  0
uio                    10204  1 uio_pdrv_genirq
i2c_dev                 6913  0
fuse                   99603  1
ipv6                  406279  30
pi@mb-pisvr1:~ $
Optionally filter for all modules with i2c in the name:
pi@mb-pisvr1:~ $ lsmod|grep i2c
i2c_bcm2835             7167  0
i2c_dev                 6913  0
pi@mb-pisvr1:~ $
Install I2C tools - may already be installed
I2C-tools package is needed and may already be installed as it was in the Raspbian Jesse release used at the time I did this.
pi@mb-pisvr1:~ $ sudo apt-get install i2c-tools
Reading package lists... Done
Building dependency tree
Reading state information... Done
i2c-tools is already the newest version.
i2c-tools set to manually installed.
0 upgraded, 0 newly installed, 0 to remove and 0 not upgraded.
pi@mb-pisvr1:~ $
Check I2C bus for devices
Use i2cdetect, one of the utilities in the i2c-tools package to scan the bus and print out all the device addresses that respond. This will show the DS1307 as it is here on address 68.
i2cdetect -y 1
pi@mb-pisvr1:~ $ sudo i2cdetect -y 1
     0  1  2  3  4  5  6  7  8  9  a  b  c  d  e  f
00:          -- -- -- -- -- -- -- -- -- -- -- -- --
10: -- -- -- -- -- -- -- -- -- -- -- -- -- -- -- --
20: -- -- -- -- -- -- -- -- -- -- -- -- -- -- -- --
30: -- -- -- -- -- -- -- -- -- -- -- -- -- -- -- --
40: -- -- -- -- -- -- -- -- -- -- -- -- -- -- -- --
50: 50 -- -- -- -- -- -- -- -- -- -- -- -- -- -- --
60: -- -- -- -- -- -- -- -- 68 -- -- -- -- -- -- --
70: -- -- -- -- -- -- -- --
pi@mb-pisvr1:~ $
Configure OS for DS1307
Edit /boot/config.txt and add rtc overlay.
Add the following to the end of the /boot/config.txt file:
dtoverlay=i2c-rtc,ds1307
$ sudo vi /boot/config.txt
Use “:$” to skip to the end of the file Press “shift-A” to append to the end of the last line
paste in the text above, use “:wq” to save and exit vi
pi@mb-pisvr1:~ $ tail /boot/config.txt

# Additional overlays and parameters are documented /boot/overlays/README

# Enable audio (loads snd_bcm2835)
dtparam=audio=on
enable_uart=1

# Configure i2c rtc overlay
dtoverlay=i2c-rtc,ds1307

pi@mb-pisvr1:~ $
Reboot your Pi after making the changes.
sudo reboot
Verify RTC Address is in use
Run i2cdetect again to verify the DS1307 address is in use. It will be in use if the address changed to UU.
pi@mb-pisvr1:~ $ sudo i2cdetect -y 1
     0  1  2  3  4  5  6  7  8  9  a  b  c  d  e  f
00:          -- -- -- -- -- -- -- -- -- -- -- -- --
10: -- -- -- -- -- -- -- -- -- -- -- -- -- -- -- --
20: -- -- -- -- -- -- -- -- -- -- -- -- -- -- -- --
30: -- -- -- -- -- -- -- -- -- -- -- -- -- -- -- --
40: -- -- -- -- -- -- -- -- -- -- -- -- -- -- -- --
50: 50 -- -- -- -- -- -- -- -- -- -- -- -- -- -- --
60: -- -- -- -- -- -- -- -- UU -- -- -- -- -- -- --
70: -- -- -- -- -- -- -- --
pi@mb-pisvr1:~ $
Use lsmod shows the rtc in use
pi@mb-pisvr1:~ $ lsmod
Module                  Size  Used by
bnep                   12051  2
hci_uart               19956  1
btbcm                   7916  1 hci_uart
bluetooth             365511  22 hci_uart,bnep,btbcm
hid_logitech_hidpp     20558  0
brcmfmac              222874  0
rtc_ds1307             13908  0
brcmutil                9092  1 brcmfmac
hwmon                  10552  1 rtc_ds1307
cfg80211              543027  1 brcmfmac
hid_logitech_dj        12173  0
rfkill                 20851  4 bluetooth,cfg80211
snd_bcm2835            24427  0
spidev                  7373  0
snd_pcm                98501  1 snd_bcm2835
snd_timer              23904  1 snd_pcm
bcm2835_gpiomem         3940  0
snd                    70032  3 snd_timer,snd_bcm2835,snd_pcm
spi_bcm2835             7596  0
i2c_bcm2835             7167  0
joydev                  9988  0
evdev                  12423  8
fixed                   3285  0
uio_pdrv_genirq         3923  0
uio                    10204  1 uio_pdrv_genirq
i2c_dev                 6913  0
fuse                   99603  1
ipv6                  406279  30
pi@mb-pisvr1:~ $
Disable the fake hardware clock
sudo apt-get -y remove fake-hwclock
sudo update-rc.d -f fake-hwclock remove
pi@mb-pisvr1:~ $ sudo apt-get -y remove fake-hwclock
Reading package lists... Done
Building dependency tree
Reading state information... Done
The following packages will be REMOVED:
  fake-hwclock
0 upgraded, 0 newly installed, 1 to remove and 0 not upgraded.
After this operation, 74.8 kB disk space will be freed.
(Reading database ... 112432 files and directories currently installed.)
Removing fake-hwclock (0.9) ...
Processing triggers for man-db (2.7.0.2-5) ...
pi@mb-pisvr1:~ $
pi@mb-pisvr1:~ $ sudo update-rc.d -f fake-hwclock remove
pi@mb-pisvr1:~ $
Update the hardware clock device file
sudo vi /lib/udev/hwclock-set
pi@mb-pisvr1:~ $ cat /lib/udev/hwclock-set
#!/bin/sh
# Reset the System Clock to UTC if the hardware clock from which it
# was copied by the kernel was in localtime.

dev=$1

if [ -e /run/systemd/system ] ; then
    exit 0
fi

if [ -e /run/udev/hwclock-set ]; then
    exit 0
fi

if [ -f /etc/default/rcS ] ; then
    . /etc/default/rcS
fi

# These defaults are user-overridable in /etc/default/hwclock
BADYEAR=no
HWCLOCKACCESS=yes
HWCLOCKPARS=
HCTOSYS_DEVICE=rtc0
if [ -f /etc/default/hwclock ] ; then
    . /etc/default/hwclock
fi

if [ yes = "$BADYEAR" ] ; then
    /sbin/hwclock --rtc=$dev --systz --badyear
    /sbin/hwclock --rtc=$dev --hctosys --badyear
else
    /sbin/hwclock --rtc=$dev --systz
    /sbin/hwclock --rtc=$dev --hctosys
fi

# Note 'touch' may not be available in initramfs
> /run/udev/hwclock-set
pi@mb-pisvr1:~ $


pi@mb-pisvr1:~ $ sudo vi /lib/udev/hwclock-set
pi@mb-pisvr1:~ $ head /lib/udev/hwclock-set
#!/bin/sh
# Reset the System Clock to UTC if the hardware clock from which it
# was copied by the kernel was in localtime.

dev=$1

#if [ -e /run/systemd/system ] ; then
#    exit 0
#fi

pi@mb-pisvr1:~ $
Read the time from the RTC
Read the time from the rtc, since it wasn’t set it may be incorrect. If everything returns OK, though, it means the OS is talking to the RTC properly. If there are problems, review the previous configuration steps for accuracy.
pi@mb-pisvr1:~ $ sudo hwclock -D -r
hwclock from util-linux 2.25.2
Using the /dev interface to the clock.
Assuming hardware clock is kept in UTC time.
Waiting for clock tick...
/dev/rtc does not have interrupt functions. Waiting in loop for time from /dev/rtc to change
...got clock tick
Time read from Hardware Clock: 2017/05/10 13:03:59
Hw clock time : 2017/05/10 13:03:59 = 1494421439 seconds since 1969
Wed 10 May 2017 09:03:59 AM EDT  -0.573043 seconds
pi@mb-pisvr1:~ $
Comparing to OS time which is set by ntp via internet
pi@mb-pisvr1:~ $ date
Wed May 10 09:02:34 EDT 2017
pi@mb-pisvr1:~ $ sudo hwclock -D -r
hwclock from util-linux 2.25.2
Using the /dev interface to the clock.
Assuming hardware clock is kept in UTC time.
Waiting for clock tick...
/dev/rtc does not have interrupt functions. Waiting in loop for time from /dev/rtc to change
...got clock tick
Time read from Hardware Clock: 2017/05/10 13:06:01
Hw clock time : 2017/05/10 13:06:01 = 1494421561 seconds since 1969
Wed 10 May 2017 09:06:01 AM EDT  -0.708993 seconds
pi@mb-pisvr1:~ $
Set the time
pi@mb-pisvr1:~ $ sudo hwclock -w

pi@mb-pisvr1:~ $ sudo hwclock -r
Wed 10 May 2017 09:04:18 AM EDT  -0.644881 seconds

pi@mb-pisvr1:~ $ sudo hwclock -D -r
hwclock from util-linux 2.25.2
Using the /dev interface to the clock.
Last drift adjustment done at 1494421454 seconds after 1969
Last calibration done at 1494421454 seconds after 1969
Hardware clock is on UTC time
Assuming hardware clock is kept in UTC time.
Waiting for clock tick...
/dev/rtc does not have interrupt functions. Waiting in loop for time from /dev/rtc to change
...got clock tick
Time read from Hardware Clock: 2017/05/10 13:04:22
Hw clock time : 2017/05/10 13:04:22 = 1494421462 seconds since 1969
Wed 10 May 2017 09:04:22 AM EDT  -0.545507 seconds
pi@mb-pisvr1:~ $
Steps for Older Versions of Raspbian
Older versions use a modprobe blacklist, don’t need to worry about it in the more current releases. Just in case, the following are additional steps I used on the older Pi when I first obtained it.
Edit modprobe blacklist - older versions
pi@mb-pisvr1:~ $ ls /etc/modprobe.d/
blacklist-rtl8192cu.conf  blacklist-rtl8xxxu.conf  fbdev-blacklist.conf  ipv6.conf  libpisock9.conf  raspi-blacklist.conf
pi@mb-pisvr1:~ $ cat /etc/modprobe.d/raspi-blacklist.conf
pi@mb-pisvr1:~ $
Edit boot config - older versions
pi@mb-pisvr1:~ $ cat /boot/config.txt
# For more options and information see
# http://rpf.io/configtxtreadme
# Some settings may impact device functionality. See link above for details

# uncomment if you get no picture on HDMI for a default "safe" mode
#hdmi_safe=1

# uncomment this if your display has a black border of unused pixels visible
# and your display can output without overscan
#disable_overscan=1

# uncomment the following to adjust overscan. Use positive numbers if console
# goes off screen, and negative if there is too much border
#overscan_left=16
#overscan_right=16
#overscan_top=16
#overscan_bottom=16

# uncomment to force a console size. By default it will be display's size minus
# overscan.
#framebuffer_width=1280
#framebuffer_height=720

# uncomment if hdmi display is not detected and composite is being output
#hdmi_force_hotplug=1

# uncomment to force a specific HDMI mode (this will force VGA)
#hdmi_group=1
#hdmi_mode=1

# uncomment to force a HDMI mode rather than DVI. This can make audio work in
# DMT (computer monitor) modes
#hdmi_drive=2

# uncomment to increase signal to HDMI, if you have interference, blanking, or
# no display
#config_hdmi_boost=4

# uncomment for composite PAL
#sdtv_mode=2

#uncomment to overclock the arm. 700 MHz is the default.
#arm_freq=800

# Uncomment some or all of these to enable the optional hardware interfaces
dtparam=i2c_arm=on
#dtparam=i2s=on
dtparam=spi=on

# Uncomment this to enable the lirc-rpi module
#dtoverlay=lirc-rpi

# Additional overlays and parameters are documented /boot/overlays/README

# Enable audio (loads snd_bcm2835)
dtparam=audio=on
enable_uart=1
pi@mb-pisvr1:~ $
Reference
Adafruit has a good article on using their RTC modules
Adding a Real Time Clock to Raspberry Pi